How to set a Static Address to PartnerTech Printers using Utility
What
You’ll Need
· Computer
· Ethernet
Cable
· Access
to Utility
o Link
to Utility J:\FullCount\Documentation\Hardware
Docs\PTT_Printer_Utility_V1.3.6.0\PTT_Printer_Utility_V1.3.6.0
1. Connect the printer to your computer via
Ethernet Cable, and ensure it’s powered on.
2. Open Utility
3. Select NetWinConfig
4. Click Seach Printer(S) and wait for it to pull
up the printer and click OK on the box that appears.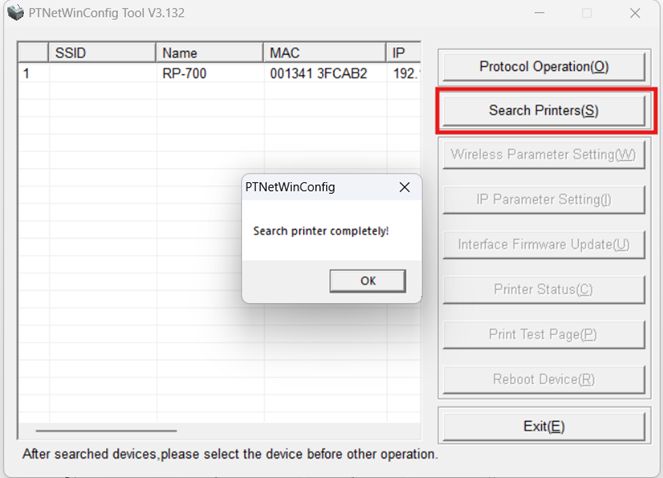
5. Select the Printer from the table and click IP
Parameter Setting(I)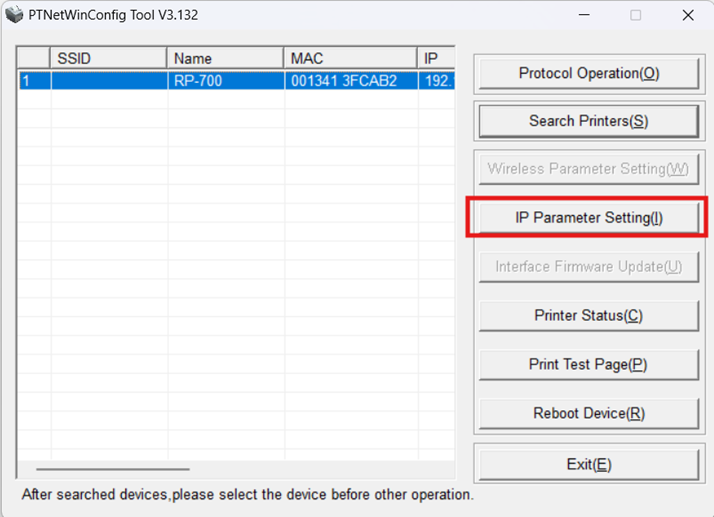
6. Leave the password Blank, just select the OK
option to proceed to the network configuration.
7. Choose the Fixed IP Address option and fill out
the fields in the box with the static information.
8. Confirm the information is correct and Click the
OK button at the bottom. After setting the information, a new box will appear,
alerting you to select the Reboot Device. Choose Reboot Device from the right-hand
side. You will need to manually power on the printer.
9. To confirm the information, you will need to
change your computer’s adapter settings to be a similar IP, just like with
Epson printers to see it and re-connect to it via the utility. You can print a test page from the utility,
or by holding the Feed button while powering the printer back on to confirm
that the printer has been configured.
Related Articles
Set Wireless Static IP and Network Settings on Tablets Using RADIUS Network Settings
Set Wireless Static IP and Network Settings on Tablets Using RADIUS Network Settings Objectives Set wireless network settings on tablets that use RADIUS Authentication. Prerequisites Tablet USB Keyboard Network information Static IP for Wireless ...Set Static IP Address on Wired Devices for OS Image 7.2.X
Set Static IP Address on Wired Devices for OS Image 7.2.X Objectives Set a static IP on a device that has a wired (Ethernet) interface. Prerequisites Wired device Keyboard Monitor/display Instructions Plug in keyboard and if necessary, display into ...Set Static IP Address on Wired Devices for OS Image 7.1.X and Earlier
Objectives Set a static IP on a device that only has a wired (Ethernet) interface. Prerequisites Wired device Keyboard Monitor/display Instructions Plug in keyboard and if necessary, display into the device. Press "Ctrl+Alt+F1" which will show a ...Set Static IP and Network Settings on DLI Tablets with OS Image 6.0.0
Set Static IP and Network Settings on DLI Tablets with OS Image 6.0.0 Objectives Set wireless and wired network settings on DLI tablets. Prerequisites DLI Tablet USB Keyboard Network information Static IP for Wireless connection Static IP for Wired ...FullCount Office Network Information / Static IP Addresses
Network Info: Description Value(s) Wired Subnet 10.5.1.0/24 Wired DHCP Scope 10.5.1.20 - 10.5.1.170 Wired Default Gateway 10.5.1.254 Wireless Subnet 10.100.1.0/24 Wireless DHCP Scope 10.100.1.20 - 10.100.1.170 Wireless Default Gateway 10.100.1.254 ...